- AODA Training Guide
How to Perform an Accessibility Audit: Step-by-Step Process
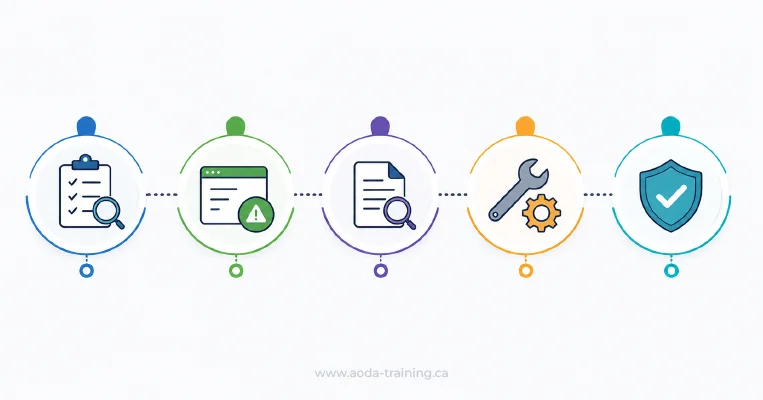
An accessibility audit is not a single test — it is a structured 7-phase process that combines automated scanning, manual evaluation, and assistive technology testing to build a complete picture of where a website stands against WCAG 2.0 Level AA.
- 4.6
93% Student Satisfaction (2K ratings)
Quantity Discounts
Price per course
6 to 20 courses
$20.95
21 to 50 courses
$17.95
51 to 200 courses
$13.95
201+ courses
Custom offer
An accessibility audit is not a single test. It is a structured process that combines automated scanning, manual evaluation, and assistive technology testing to build a complete picture of where a website or digital product stands against WCAG 2.0 Level AA.
This guide explains each phase in the order it happens — from deciding what to test, through to delivering a report your development team can act on.
Automated accessibility scanners are valuable, but they catch only 30–40% of WCAG failures. The issues that most affect real users — keyboard navigation traps, confusing form interactions, screen reader announcements that make no sense — require a human to find. A credible AODA audit always includes manual testing. An automated scan alone is not a compliance audit.
The accessibility audit process at a glance
| Phase | Activity | Who does it | Typical time |
|---|---|---|---|
| 1 | Scoping — define what will be tested and against what standard | Audit lead + client stakeholder | Half day |
| 2 | Automated scanning — run tools across all scoped pages | Developer or auditor with tools | 1–2 hours |
| 3 | Manual testing — check what automated tools cannot assess | Accessibility specialist | 1–2 days |
| 4 | Assistive technology testing — screen reader and keyboard testing | Trained AT tester | Half–1 day |
| 5 | Issue documentation — record, classify, and prioritize findings | Auditor | Half–1 day |
| 6 | Report writing — produce the audit report | Audit lead | Half–1 day |
| 7 | Remediation support (optional) — assist the development team | Auditor + developer | Ongoing |
Phase 1: Scoping the audit
Define exactly what will be tested and how
Scoping is the most important phase of an accessibility audit and the one most often skipped by inexperienced auditors. Without a clear scope, findings are inconsistent, reports are incomplete, and remediation effort is misdirected.
- Identify the pages or flows to be tested — for large sites, agree on a representative sample that covers key templates, interactive features, and user journeys
- Confirm the standard being tested against: WCAG 2.0 Level AA for AODA compliance
- Identify which browsers and assistive technology combinations will be used in testing
- Confirm what the report should include: full WCAG criterion references, severity ratings, screenshots, code examples
- Identify any known issues or areas of particular concern to address during manual testing
Choosing a page sample for large websites
For websites with hundreds or thousands of pages, testing every page is impractical. The standard approach is to select a representative sample that covers:
- The homepage
- Key conversion pages (contact, checkout, booking, sign-up)
- One example of each major page template (product page, blog post, service page, landing page)
- Any page with significant interactive components (forms, modals, carousels, date pickers, maps)
- Any page that has received accessibility complaints or feedback
- Documents (PDFs, Word files) linked from key pages
Phase 2: Automated scanning
Run tools to find detectable WCAG failures quickly
Automated tools scan HTML and CSS for accessibility issues that can be detected algorithmically. They are fast and consistent, but limited: they cannot judge whether alt text is meaningful, whether a page makes sense to a screen reader user, or whether navigation is logical.
- › Run axe DevTools browser extension across all scoped pages and export results
- › Run WAVE browser extension for a visual overlay of errors and structural alerts
- › Check Google Lighthouse accessibility scores (note: a high score does not mean WCAG compliant)
- › Record all automated findings by page and criterion — do not discard false positives without investigation
- › Flag issues that require manual verification (automated tools often flag "needs review" items that require judgment)
What automated tools find — and what they miss
| Automated tools reliably find | Automated tools cannot assess |
|---|---|
| Missing alt attributes on images | Whether alt text is accurate and useful |
| Missing form labels | Whether label text clearly describes the expected input |
| Colour contrast failures (foreground vs background) | Contrast for text on images or gradients (requires manual check) |
| Missing document language declaration | Whether the declared language is correct |
| Duplicate IDs in HTML | Whether ARIA attributes are used correctly in context |
| Missing page title | Whether the page title is descriptive |
| Some ARIA attribute errors | Whether a custom component works correctly for AT users |
| Video elements without a <track> element | Whether captions are accurate and complete |
Phase 3: Manual testing
Evaluate what tools cannot — using human judgment
Manual testing is where the most significant accessibility issues are found. A trained tester works through each WCAG success criterion that cannot be automatically evaluated.
- › Keyboard navigation: Tab through every interactive element on every scoped page — confirm focus is visible, order is logical, and no keyboard traps exist
- › Focus indicators: confirm the focus ring is visible on all interactive elements (clearly perceptible, not just the default browser outline)
- › Alt text quality: review every image's alt text against the image's context and purpose
- › Link text: review all links for descriptive text — flag "read more", "click here", and duplicate link text pointing to different destinations
- › Heading structure: verify heading hierarchy is logical and that headings describe the section that follows
- › Form usability: complete each form with keyboard only, check error handling, and verify that instructions and error messages are sufficient
- › Colour and sensory: check that information is not conveyed by colour alone
- › Motion and animation: test pause/stop controls on any auto-playing or moving content
- › Session timeouts: verify users can extend time limits or are warned before timeout
- › Document accessibility: open PDFs and Word files and evaluate tagging structure, reading order, and alternate text
Keyboard testing protocol
Keyboard testing is the single most impactful manual test because keyboard accessibility is a prerequisite for screen reader access. The testing protocol is:
- 1 Open the page in a browser with no mouse accessible
- 2 Press Tab to move through the page — confirm every interactive element receives focus in a logical order
- 3 Activate each element using Enter or Space — confirm it performs its expected action
- 4 For dropdowns and custom widgets, test arrow key navigation
- 5 For modals and dialogs, confirm focus moves into the modal on open and returns to the trigger on close
- 6 For carousels and sliders, confirm controls are reachable and operable
- 7 Confirm there are no keyboard traps — elements you can Tab into but cannot Tab out of
Phase 4: Assistive technology testing

Test with screen readers to validate the real user experience
Assistive technology testing evaluates the experience for users who rely on screen readers, voice control, and other AT to access the web. It frequently reveals issues that automated and manual testing miss.
- › Test with NVDA + Firefox on Windows (most widely used screen reader / browser combination in professional audits)
- › Test with VoiceOver + Safari on macOS (important for Apple device users)
- › Test with VoiceOver + Safari on iOS for mobile-specific issues
- › Navigate using screen reader heading shortcuts to evaluate heading structure
- › Navigate using links list to evaluate link text quality
- › Navigate using landmarks list to evaluate page structure
- › Complete key user journeys — contact form, product purchase, account registration — using screen reader only
- › Test all custom interactive components: carousels, tabs, accordions, modals, datepickers
- › Verify that dynamic content updates (error messages, live regions, loaded content) are announced appropriately
Phase 5: Issue documentation
Record, classify, and prioritize every finding
- › Record the WCAG success criterion that is violated (e.g. 2.1.1 Keyboard Accessible)
- › Record the WCAG conformance level (A or AA)
- › Assign a severity rating: Critical, Serious, Moderate, or Minor
- › Record the URL and page section where the issue occurs
- › Capture a screenshot or screen recording showing the issue
- › Note the relevant HTML or ARIA code snippet
- › Write a concise description of the issue in plain language
- › Write a recommended fix with enough technical detail for a developer to implement
- › Note whether the issue appears across multiple pages or is isolated to one template
Keyboard testing protocol
| Severity | Definition | Example |
|---|---|---|
| Critical | Prevents a user with a disability from accessing content or completing a task entirely. No workaround available. | A checkout form that cannot be submitted using a keyboard — blind users and keyboard-only users cannot complete a purchase. |
| Serious | Significantly impairs access or completion. A workaround may exist but is not obvious or requires significant effort. | A dropdown menu that is reachable by keyboard but whose items cannot be selected without a mouse. |
| Moderate | Causes difficulty but most users can still access content or complete the task with effort. | Placeholder-only form labels that disappear on input, making it hard to remember what a field requires. |
| Minor | Low impact on most users. Represents a technical failure but does not significantly impair usability. | A decorative image with alt text that could be improved but does not prevent access to information. |
Phase 6: Writing the audit report
Produce a document your team can act on
- › Executive summary: number of issues found by severity, key risk areas, and recommended immediate actions
- › Methodology section: pages tested, tools used, AT combinations, and dates of testing
- › Prioritized issues list: all findings sorted by severity, each with WCAG reference, description, screenshot, and recommended fix
- › Template issues noted: where an issue appears across multiple pages due to a shared template
- › Remediation roadmap: a suggested order for addressing findings, starting with Critical and Serious issues on high-traffic pages
- › Appendices: full page-by-page findings, automated scan exports, and tool outputs
- › A compliance score or percentage — WCAG compliance is pass/fail, not scored
- › A certificate of compliance — audit reports document findings at the time of testing; new content and code changes create new issues
- › Legal advice — audit reports identify accessibility issues; their legal implications are a matter for legal counsel
- › Recommendations to "generally improve accessibility" — every recommendation should be specific, actionable, and linked to a WCAG criterion
Phase 7: After the report — remediation and retest

An audit report is the beginning of the compliance process, not the end. The most effective organizations treat the report as a project plan and assign findings to owners immediately.
Prioritize by impact
Start with critical issues on high-traffic pages. A critical keyboard navigation failure on the homepage affects every keyboard user who visits — far higher priority than a minor contrast issue on a rarely-accessed policy document.
Assign to the right teams
Developers fix code. Designers address colour contrast and focus indicators. Content editors fix alt text and link text. Document owners remediate PDFs. Route each finding to the right owner to prevent bottlenecks.
Build it into the workflow
Fixing existing issues is only half the work. Add accessibility checks to design review, development QA, and content publishing workflows so new work does not create new compliance debt.
Retest and document
After remediation, retest the fixed elements to confirm issues are resolved correctly. Document the retest — this creates the evidence trail that matters most if a government audit or complaint investigation follows.
- Accessibility Remediation: How to Fix WCAG Issues
Internal audit vs external audit: what's the difference?
| Factor | Internal audit | External (third-party) audit |
|---|---|---|
| Cost | Lower — primarily staff time | Higher — specialist fees, but scoped to specific deliverables |
| Expertise | Depends on in-house skills. AT testing in particular requires trained specialists. | External auditors bring specialist WCAG knowledge, AT testing skills, and experience across many sites |
| Objectivity | Risk of blind spots — in-house teams are close to their own content | External perspective is more likely to identify issues that internal teams overlook |
| Credibility | Useful for internal improvement; limited value in compliance contexts | Higher credibility for compliance reports, responding to complaints, and demonstrating good faith to regulators |
| Ongoing use | Practical for regular internal checks between formal audits | Best for formal compliance assessment, pre-launch testing, and post-complaint response |
Frequently asked questions
How long does an accessibility audit take?
- A website audit of a small site (up to 20 pages) typically takes two to three days of testing time, plus report writing. A medium site (20–100 pages) takes three to five days. A full organizational AODA audit that also covers policies, training records, and employment documentation adds one to two days. Timeline from scoping to report delivery is typically two to four weeks for a professional external audit.
Can I use a single automated scan as my AODA compliance evidence?
- No. An automated scan captures 30–40% of WCAG failures and cannot assess keyboard usability, screen reader experience, or the quality of alt text and link text. It provides useful baseline data but is not a compliance audit. If your organization needs to demonstrate accessibility compliance — for a compliance report, in response to a complaint, or as part of a procurement requirement — a full audit including manual and AT testing is required.
How often should an accessibility audit be conducted?
- For organizations with active websites, a full audit every one to two years is reasonable, supplemented by automated scanning as part of the regular development workflow. A new audit should be triggered by a major website redesign, a new content management system, a significant expansion of the site, or a complaint about accessibility. For organizations with 20 or more employees, the AODA compliance report filed every three years should be based on a current audit.
What qualifications should an accessibility auditor have?
- Look for auditors with demonstrable experience in WCAG 2.0 Level AA testing, including manual testing and AT testing skills. Recognized credentials include the IAAP Web Accessibility Specialist (WAS) and Certified Professional in Accessibility Core Competencies (CPACC). Ask potential auditors to share sample reports, explain their testing methodology, and confirm which AT combinations they use. The quality of the report matters more than any credential.
Do we need to reaudit after fixing the issues from the first audit?
- Retesting specific fixes is strongly recommended. A retest confirms that remediation was implemented correctly — it is common for a fix to resolve one issue while inadvertently creating another. Full reaudit after complete remediation is not always necessary, but targeted retesting of high-severity findings before filing a compliance report is good practice.
Commission a professional AODA accessibility audit
If you want a full picture of your website’s WCAG 2.0 Level AA compliance — not just what automated tools find — our audit service covers all seven phases: scoping, automated scanning, manual testing, AT testing, issue documentation, reporting, and optional post-remediation retesting.
- Scoped to your key pages and user journeys
- Manual WCAG 2.0 Level AA testing by an accessibility specialist
- Keyboard navigation testing across all interactive elements
- Automated scanning with axe and WAVE
- Screen reader testing with NVDA (Firefox) and VoiceOver (Safari)
- Prioritized audit report with WCAG references, severity ratings, and code-level fix guidance